Don't forget to check your grades. I just updated the screen capture of the spreadsheet, on Monday November 27th (today).
Check the website again for the textbook notes from last week (Week 13). I've got the page by page topic list updated for what all we covered. I also added some advice for doing the ENCODER electrical diagram with BLOCKS.
I expect we'll be out by 9:30 tonight.
Textbook Significant Facts:
None, but there'll be some next week.
Collected during class: Students turned in the ENCODER electrical diagram
with blocks and polylines, assigned last week.
Demonstration in class:
Note: thes below procedure was written hastily Monday morning December 4th. There might be some typos or glitches.
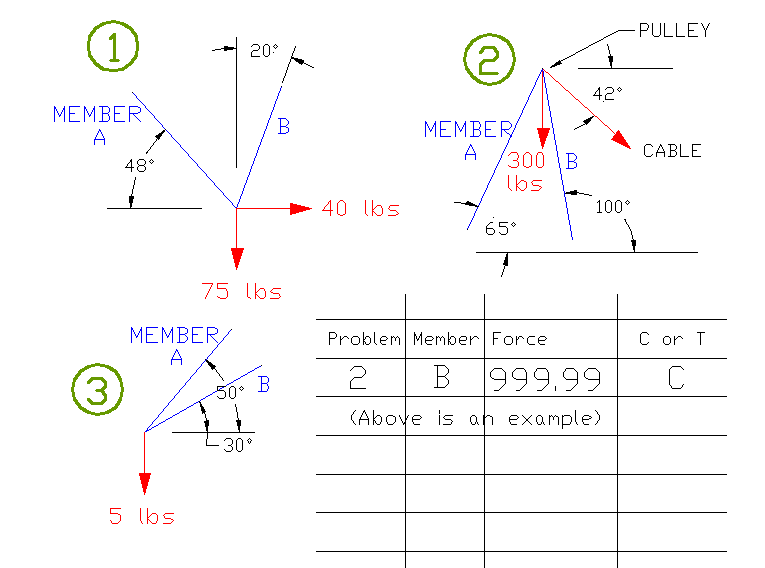
I showed how to do the vector assignment problems with AutoCAD. For each problem, draw the members and the force/s using the actual angles as dimensioned on the white board (also shown in screen capture below). The forces should be as long as they are strong, that is: draw a 100 lb force as 100 AutoCAD units long.
Next (for multiple force problems) copy (or move) one of the force "lines" to the arrow end of the other. The "Resultant" (or vector-sum) of the two forces is then a line from the tail of one to the head of the other.
Then copy the two lines for the members so that one intersects the new Reslutant "arrow", and the other intersects the tail. Scale or Fillet these two construction lines so they meet. Mark arrows on each construction line toward the "Tail" of the Resultant. The Resultant vector and the two construction lines should now be a complete closed polygon, with all the arrows pointing the same direction (clockwise or counter-clockwise).
Use the List or Dist command to find the magnitude (strength) of each construction line to find the number of lbs in each member.
Last, Move or Copy the construction lines back onto the original members. Note which way the arrow points, toward the point of the applied force, or away from the point where the force is applied. If the arrow points away, thent he member is in Tension, and is nbeing slightly stretched. If the arrow points to the point of the applied load/s (force/s), then the member is in compression, and is being slightly crushed by the force/s.
As descibed below, develop a chart listing the problem number, Member A or B, the load that the member is supjected to, and C or T to indicate whether the force is Tension or Compression.
Note: When a pulley is involved in the problem, be aware the Tension in the cable must remain constant throughout the cable. In short, the "weight" force is applied in two directions: straight down, and toward in the "lifting" cable end.
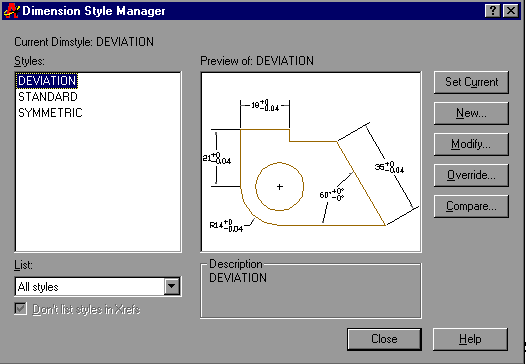
Also in class, I showed the class how to develop dimension styles that include tolerances, AND how to draw the Geometric Dimension and Tolerancing symbols using AutoCAD's "Tolerance" command (or icon on the Dimension toolbar).
Due next class: I figure I'll let the class determine the 2D vector problems, and draw them on the white board. You'll have one week to complete them. You must use AutoCAD, to provide the accuracy (say 2 decimal places) As of Monday Nov 27, I still haven't found an easy way to use AutoCAD to analyse 3D vector problems.
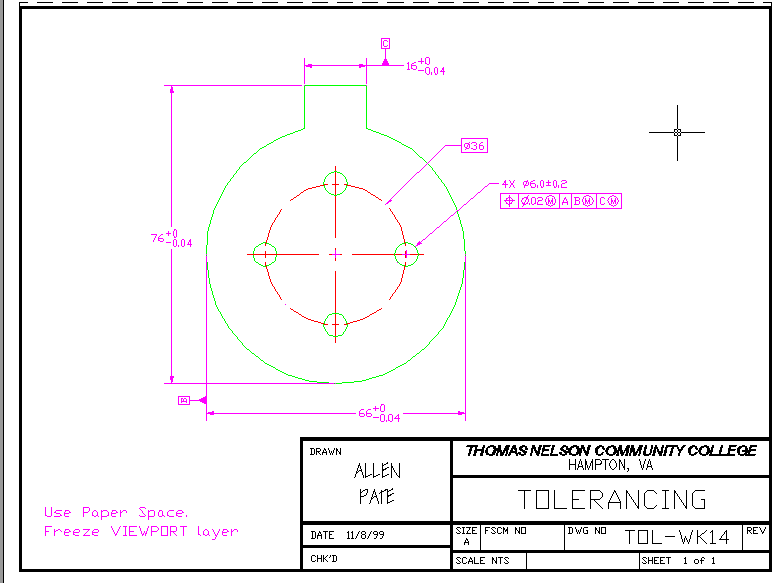
The deliverable will be a single sheet of paper with the magnitudes and directions (T or C) for the vector problems). I'll sketch out a sample chart during class tonight. In class I sketched the below problems on the white board. Please turn in (at start of next class) a sheet with handwritten numbers similar to as shown in the chart below. The Force numbers shouls be accurate to 2 decimal places, to indicate you used AutoCAD to find them (and not just drawn with manual drafting equipment). You may instead (or also) place the chart on your Tolerance CAD assignment (discussed below), by typing the chart somewhere in the CAD file. ALSO: Students are to replicate the below tolerance assignment (not in the textbook), to practice creating dimension styles that include tolerances. The GD&T symbols should be individually done with the Tolerance icon on the Dimension toolbar (nothing to do with the dimstyles). Scale the tolerance symbols up or down as necessary, but remember you can't explode a tolerance symbol.
Use a layout (Paper Space), like you did the Dimensioning assignment, but remember to freeze the layer on which the Viewport resides. DON'T draw ANYTHING on the DEFPOINTS payer. This layer doesn't print out.
Heads Up:
Next week will be another short class.
I'll go through the initial syllabus for any loose ends
I might have missed over the last 14 weeks.
Be prepared (bring some No-Doze) for another page by page book highlights session.
The Final exam will be the usual time we have class, but on the "16th" week. Expect a vector problem similar to those assigned today. Angles and the loads may of course be different.
Also, in the past I've been burned for taking too long to turn in the final grades, If there are any questions about loose ends or missed assignments, PLEASE get with me soon, so I don't have to delay the final grades to make the resolution. And PLEASE don't ask me about extra credit. I'm too busy to assign and grade extra credit this semester. Sorry.